ISO is incredibly important, but it’s also one of the most confusing concepts in photography. For beginners especially, it can be a tough subject to tackle. Here we explain ISO in photography in detail and frequently asked questions.
But with the tips and information we’ve provided here, you should have a much better handle on how ISO works and what proper usage looks like. Hopefully, this will help you pick the right ISOs, reduce your grain/noise while capturing pictures, and ultimately get more from your camera.
What Does ISO Mean in Photography?
ISO is the value of how a camera sensor adjusts its sensitivity to light, given by a number, is one of these standards. ISO stands for International Standardization Organization, It is an organization that sets international standards for all different kinds of measurements but when in reference to camera and photography then ISO is the camera’s sensitivity to light.
ISO is a setting in your camera that controls the sensitivity of the image sensor. It allows you to change how much light is required to take an image.
This should be a term you embrace as an essential part of your vocabulary. It’s not as intimidating as it sounds, and once you understand what ISO is, you’ll find value in knowing your ISO number for each situation you find yourself in.
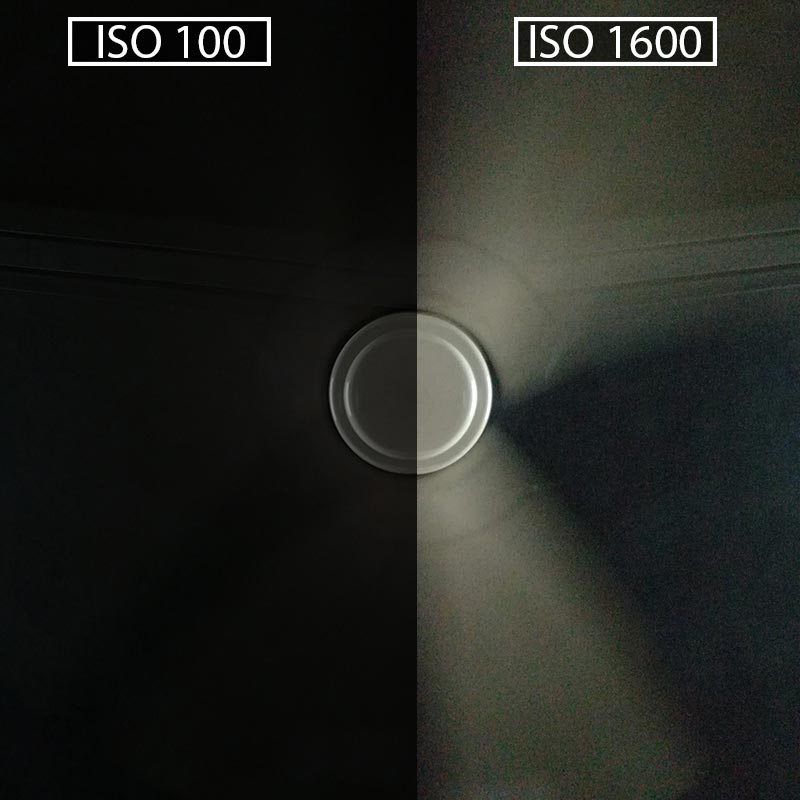
➜ The higher the ISO, the more sensitive it will be to light. The lower the ISO, the less sensitive it will be to light.
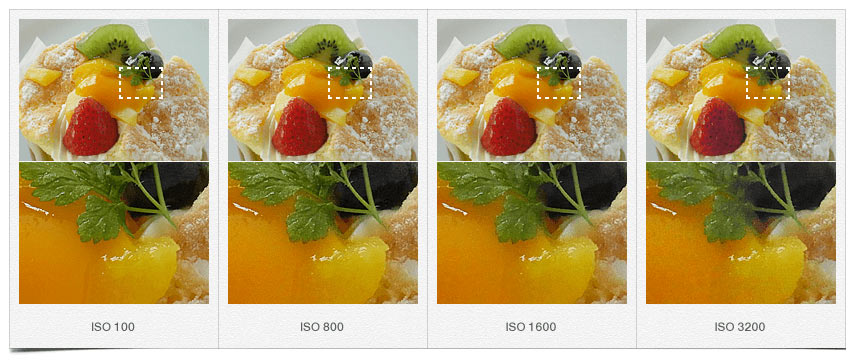
➜ Images shot with a high ISO can appear grainy and less detailed. On the other hand, a low ISO produces a clearer and more defined image.
How is ISO measured in photography?
How does ISO measurement on a digital camera work? It seems so complicated, yet on some cameras, this is a simple option to select from on the setup screen.
➜ It’s a measure of the speed of your sensor, and it goes from 1 to roughly 25600+, with each number increase representing a doubling of light sensitivity.
➜ An ISO 6400 setting is twice as sensitive to light as an ISO 3200 setting, and so forth.
The scientific world has not standardized camera ISO numbers, so each manufacturer has come up with its own way to measure this key physical attribute of a digital camera.
For example, Canon cameras use a certain ISO number that’s different from other manufacturers’ ISO values. DSLR ISO values are also based on the DIGITAL gain setting, which means they can vary depending on how many megapixels the camera is designed to handle.
TL;DR: increased ISO means increased light. That’s how it’s measured.
What is the normal ISO for photography?
Your camera ISO will depend on many different factors, such as the type of camera you’re using, the shutter speed you’re using, and whether or not your camera is set to auto ISO.
Generally, when shooting in a studio setting, you should be staying in the ranges like 80, 100, 200, and 400. They create the sharpest possible images and allow you to take pictures in low light without getting too grainy.
➜ If you need even higher sensitivity in low light conditions, consider illuminating your environment well or taking long exposure shots. Do use a tripod for long exposures!
➜ If your environment is overly bright (e.g. a sunny morning), and the lowest ISO is still overexposing your shot, consider stacking ND filters over your lens to block out the sunlight and reduce light hitting your sensor.
The goal is to keep your image crisp and properly exposed, without any noise. Whichever helps you achieve that is the correct ISO for you.
How does ISO affect a photo?
ISO affects a photo sensor’s ability to read light. The higher the ISO number, the more light it takes in. This means ISO affects your image’s overall brightness, which also affects the color, noise, and texture of the photo.
However, an ISO rating alone does not determine how noisy or clean a photo will be. Many other factors, such as the camera’s megapixel rating, the size of its sensor, and the quality of its lens, must be considered in addition to ISO in order to make an educated assessment of image quality.
When should you use a low ISO?
1. When you select a lower ISO, you get a better dynamic range. This means that all the minute shadows, highlights, muted and vibrant colors – will be better captured with a low ISO.
2. Low ISO settings also result in less image noise, as there is no amplification of the signal. The lower the setting, the less grain you will see in your photos.
3. Low ISO allows for more freedom with shutter speeds, allowing for no motion blur in your photos. But you must always use a tripod for that!
But don’t keep your ISO so low that the image is completely underexposed!
When should you use a higher ISO?
1. The higher your ISO setting, the more light your camera sensor will receive. This is useful in low-light conditions.
2. With higher ISO, more digital noise is introduced into your photos. This can result in blotchy grainy specks of color within darker areas of your photo.
3. If you are snapping action shots or images indoors without a flash, increasing your ISO will likely cause some ugly digital artifacts. Thus, try to illuminate your environment or use a flash whenever possible.
It’s not usually too noticeable if you have a fast enough shutter speed to compensate for the increased ISO. Fast shutter speed also eliminates motion blur.
How does the ISO affect exposure?
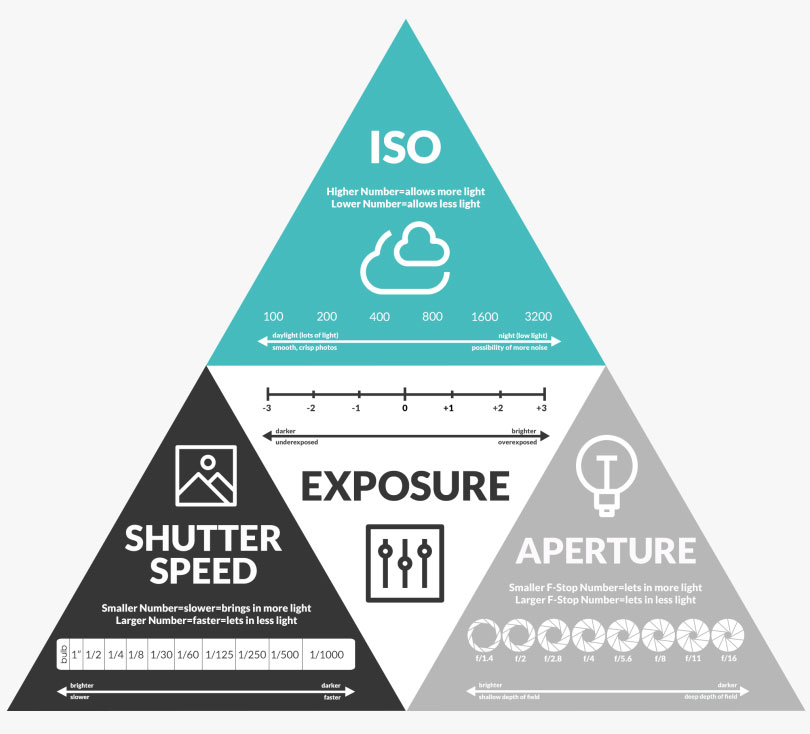
ISO affects exposure by adjusting your sensor’s sensitivity to light. The higher the ISO number, the more sensitive the sensor and the more light is let in. Different cameras will handle this change in sensitivity differently.
The opposite is also true. When you are adjusting the exposure of your images, the ISO is affected as well. As you increase or decrease exposure with either exposure compensation or by changing the exposure of your camera, the ISO will be adjusted.
How to Change ISO: Camera Setting
You may modify the ISO values by pressing the ISO button on the body of most DSLRs, notably high-end ones like the Canon EOS 5D Mark IV. The ISO function is also accessible in the camera’s settings menu on other cameras, such as handheld cameras and older DSLRs.
There are 3 camera modes that allow you to adjust ISO with varying results – Program (P) or Sensitivity priority (Sv) mode, Manual (M) mode, AUTO (A or A+) mode.
➜ In P or Sv mode, you can manually adjust the ISO, and the camera will automatically adjust the other exposure settings including shutter speed and aperture.
➜ In M mode, you choose the ISO, aperture, and shutter speed all manually. This mode is the best if you want the highest exposure customization possible.
➜ In A or A+ mode, everything is adjusted automatically by the camera. This mode is ideal if you need to take images on the go without having to bother about changing settings every time.
What is Auto ISO and when Should You use it?
If you’re like most photographers, you probably shoot in a single exposure mode, whether that’s ISO-Priority, Aperture-Priority, or maybe even Manual. As a result, the ISO value of your camera tends to be consistent for any similar shooting conditions.
There could be times where you want to take a photograph with a much higher sensitivity to light than your standard ISO value, for which, wider or faster lenses are required. In such cases, Auto ISO can maintain a high-quality photograph at a lower sensitivity, by automatically raising the sensitivity according to the lighting.
Auto ISO can be a deceptive setting. It looks great on paper but it’s not the miracle worker that many people believe it to be. The auto ISO range that your camera gives you is broad enough to produce good images in a limited range of situations. In very low-light settings, it’s practically useless.
Also, you have no idea exactly how much light is being captured until after you take the photo. So while Auto ISO can work for some, it should only be used as an additional setting, not something to rely on exclusively.
ISO Used for Different Scenarios
Let us briefly discuss all the possible ISO settings for all kinds of scenarios.
What is the best ISO for night photography?
The best ISO for night photography is between 500-800. Anything higher than 800 will show too much noise. However, if it’s still too dark 400-500, we’d recommend staying at 800 and increasing your exposure time. This will help tremendously with the noise.
What is the best ISO setting for the outdoors?
ISO 100 to 200 is the most setting for outdoor. It’s good for all outside environments and gives you a clean picture with a minimal amount of noise.
What is the best ISO for Product photography?
ISO settings for product photography aren’t that straightforward. We’ll explain why.
For instance, if your product is really reflective so you need to have a high ISO value. But that doesn’t guarantee a good picture as reflections will cause issues.
So, do try to minimize reflections as much as you can.
➜ ISO 400 or 800 are generally suitable values for all-purpose product photography. It works well for most cameras so you should be able to achieve good shots without too many issues.
➜ If you’re capturing creative shots like water splashes with your product, then you need to raise your shutter speed which would inevitably darken your image. Thus, increase your ISO accordingly but not so much that it brings in noise. Illuminate your studio better to mitigate such issues.
What is the best ISO for Landscape Photography?
In general, it’s a challenge to properly expose landscape photographs, and this is even truer with the rise of high-resolution sensors in today’s DSLRs.
An ISO range of 100-400 or 200-800 is typically recommended for shooting with most cameras, but different factors will come into play when determining the optimal ISO. These include your individual camera settings, environment light levels, and, most importantly, your personal style and shooting discipline.
➜ Overall, a good ISO 400 film will deliver a stronger signal-to-noise ratio than a good ISO 800 film, even if that ISO 800 film can stop the action in very low light conditions. Since stopping action is not a major concern for landscape shots, an ISO value of around 400 is good.
What is the best ISO setting for indoors?
There is no perfect ISO setting for indoors or at night – there are too many variables.
➜ If you want to take less noise photos with the best quality, the lowest ISO to use is 200. You also need to use a slower shutter speed because your ISO won’t be able to go very low without underexposing.
Some people use ISO ranges of 800-1600 indoors with great results. This is because they expose the image properly by adjusting the shutter speed and aperture as well. Additionally, there is always some post-processing needed to polish indoor shots, no matter how well it’s captured.
What ISO setting is best for action shots?
For overall versatility, 400-1200 is the way to go. It doesn’t have quite the fast shutter speed of 3200, but it also doesn’t have quite as much noise. On top of that, you can get usable images with ISO 400-1200 even in post-processing, especially by using a flash.
Common FAQs regarding ISO
What is noise and how does it relate to ISO?
Noise is the result of electronic fluctuations that occur when an image is captured with an analog-to-digital converter (for example, the CCD chip in a digital camera). Noise is an inherent property of digital photographs and is directly affected by the ISO setting.
This is how much “grainy” detail is seen in the pixels. Most photographers dislike grainy details because they do not accurately reflect how the image appears in real life.
An increase in ISO will inevitably result in an increase in noise.
What ISO is grainy?
In a completely dark room, any ISO over 200 will start to appear grainy. Thus, it depends on your lighting conditions.
Is lower ISO always better?
Yes, lower ISO is always better except when your images are underexposed. An underexposed shot will be very difficult to adjust in post-production. So, while lower ISO is better, don’t keep it too low. Either raise the ISO or raise the lighting.
How should I decide what ISO I should use?
If you’re not sure about what ISO to use, pick the lowest one (typically ISO 100). After taking a few test shots, you will easily find out if your settings are too dark or too bright.
Final Thoughts
Throughout, we broke down everything you need to know about understanding ISO so that you can be an educated photographer. Armed with this knowledge, you’ll be able to understand what ISO is in photography and how it can help you.
We hope this article unleashed newfound confidence in your photography journey!